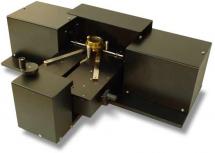
iROLL HR

Description
Incorrect roll profiles can lead to bad double seams and non-compliance with double seam standards!
Using a non-contact, laser based profiloscope – the inROLL is able to scan profiles of seaming Rolls and Chucks (or other tooling – including carbide and ceramic tools) easily and quickly. The system can be used for acceptance testing for new seaming rolls or chucks, for quality assurance purposes and for stress analysis.
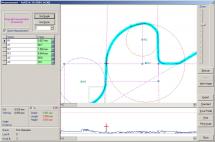
inROLL is the first dedicated computerized non-contact seaming Roll and Chuck gauge. By scanning the profile, it is capable of detecting defects, analyzing angles, radii, measuring distances and automatically measuring the differences between a roll’s specification and the current scan. This system replaces optical comparators, projectors and other techniques for comparing contour profiles for rolls, chucks and other tooling.
Using a micrometric table, the operator can position practically any roll or chuck into view. Once positioned correctly, the operator captures the image and analyzes it against a given standard graph, which can be either a previously scanned image (the same tooling when it was brand new) or a CAD drawing.
The operator can:
- Zoom in and out of the profile
- Find any radius, angle or distance on the profile
- Export the profile to CAD or compare it with a CAD drawing
- Import a reference profile from a CAD drawing
(including region of interest areas) - View automatic measurements (compare it to the spec)
Each standard can have “regions of interest”, which allows the operator to automatically measure radii and angles anywhere on the profile. The measurements can be integrated into reports and inspected for variations over time, both between different rolls and for the same roll at different measurement positions.
For rolls, the system will automatically detect roll depth, height and length. For chucks, the system automatically measures the chuck width. Both first and second operation Rolls can be inspected easily. The system can print out 50x graphs (or other ratios) – which can be compared with the original drawings of the Roll. Finally, can makers will be able to inspect new Roll and Chuck profiles before placing them on the production line.
Placing faulty Rolls or Chucks in the production line without inspection can produce faulty seams – which can stop production (or worse).
Key Benefits
- Locate duplicate roll & chuck designs – reduce inventory
- Catalog rolls & chucks
- Acceptance testing for rolls and chucks – prevent mistakes in production!
- Monitor tooling wear to replace rolls and chucks only when they need to be replaced
- Isolate bad profile designs
- Compare design with manufacturing
- Reverse engineer tooling design
- Compare designs from different manufacturers
(New: full import of DXF diagrams as reference standards, including radius and angle regions of interest!)

Key features
- Non-contact scan will not be skewed by pins or other mechanical means
- To-scale printing (50:1 ratio is standard)
- Export and import from CAD systems (DXF, point list and image support)
- Automatic extraction of Regions of Interest from DXF diagrams!
- Automatic and manual correlation between standard and measurement profiles
- Automatic measurements, which can measure any angle or radius
- Standard requirements
- Automatic length, depth and height measurements for rolls
- Automatic chuck width measurement
- One optical unit works with all tooling
- Multilingual!
- Automatic radius and angle finder
- Allows the operator to measure any angle, distance and/or radius
- Runs under WindowsTM
- High resolution system!
Return on investment
Customers using the inROLL system were able to quickly return their investment by evaluating rolls and chucks they had in storage. When companies have problems with a particular head, they often choose to use a different roll or chuck. Often, these “suspicious” rolls and chucks are placed in a storage room full of other rolls and chucks.
No one is truly sure if these are good or bad rolls, and because of their high costs they are typically not thrown out. Customers who used the inROLL system on such rolls found that between 70% and 80% of their rolls were in good shape, and were able to recover them and reuse them. Other rolls were thrown away or returned to the manufacturer in situations where they did not match the original requirements. As rolls are quite expensive, this is a great way to quickly recover the cost of the system!
Manufacturing often produces different results from the original design. The inROLL allows you to import your diagrams directly from AutoCADTM or other CAD software (using the universal DXF format). Regions of interest are extracted automatically based on the DXF design and the actual profile can be accurately compared with the original CAD drawings!
Reduce your inventory by finding bad rolls, rejecting them or placing them back into circulation.
Some manufacturers may have identical roll designs with different catalog numbers, reduce inventory by combining all identical rolls into one stockpile.
Specification
| Resolution | 0.0002″ (2 ten thousandths) or better (0.25″ range) |
| Calibration resolution | 0.0001″ (1 ten thousandth) or better |
| Roll & chuck Diameter: |
1.75″ to 7″ (custom diameters upon request) |
| Distance from roll bottom to groove |
Up to 2″ |
| Angles | Up to 89.4 degrees |
| Radius | Higher accuracy: .25″ or less Lower accuracy: above .25″ |

